Thanks to a good boss I also have tomorrow off, so I have four days off to make miniatures!! We decided to get out and enjoy the afternoon at the MUN Botanical Gardens (MUN is the local university, Memorial University of Newfoundland). I got lots of ideas for my full size garden, plus great ideas for the mini garden around the shed. I thought I would share a few of the pictures of the flowers from the Botanical Gardens. Everything was beautiful!
The first two pictures were of a large vine that had wrapped itself around an arbor. I thought it would be a good help for when I build the vine for the trellis on the garden shed. I love the twisted branches working their way up the side of the arbor.


The I took some pictures of the Rhododendrons. I got three shots of the flower at different stages of blooming!


I'll share more pictures in the future.
Back to minis:-
I needed a break from the printies, so in the morning, I decided I would make a small carrier for the garden tools in my shed. I made a template, and then decided it needed to be a bit larger. (Note for future: always go with your first impression!!) I decided to cut out four because there was going to be some curves and holes in the middle section and I was afraid I would break the wood while making those cuts. I was correct, and now I have three carriers (not four) drying at this point.
Here are some pictures of the carrier in progress:-

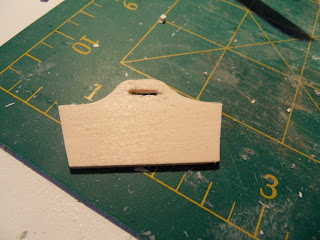


The completed carrier, ready for final sanding and painting, and of course filling!!

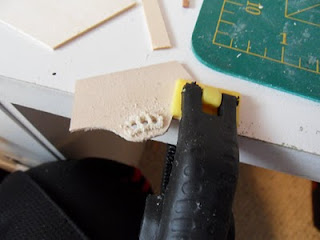
After I glued it, I realized it was much too big, and had to break in down again and recut it smaller!! See! I should have went with my first impression. I used the same technique to make the hole for the handle that I used when I made the bread trays for my bakery. (I'll show those another day!)
I drilled three holes towards the top of the center section, and then cut out the wood between the holes. Then I used a nail file that I trimmed down to fit into the hole and sand it smooth! So far I have everything glued, but I still have to paint and fill the carriers. Looks like I will have two extra to share once I finished this project, since I was successful in not breaking 3 of the 4 I cut out!!
So tomorrow hopefully I will show you the filled carrier, complete with supplies!
-Wanda