Showing posts with label Garden Shed. Show all posts

Flower bed progress

I've had a successful day off from work (Statutory holiday in Newfoundland) and I've been busy in my real garden and in my mini garden.  I've completed all the tulips (actually I still have lots left over) and I completed one of the Hollyhock kits I purchased in Toronto last week. 
First a little Kit Review.........
This is the third type of flower kit I've assembled, the first two being Hanky Panky flower kits and Bonnie Lavish flower kits.  This kit was produced by Carrie Domm and Connie Stitt in Ontario.  The kit is ten years old (based on the copyright date on the instructions) so I don't know if they still produce them.

By far Bonnie Lavish kits are my favourite to assemble, with very little instructions they are so easy to work with.  Hanky Panky kits vary by the flower, the best individual kit I have ever put together was from Hanky Panky, the geranium kits, but I've tried others that I have even yet to complete. 

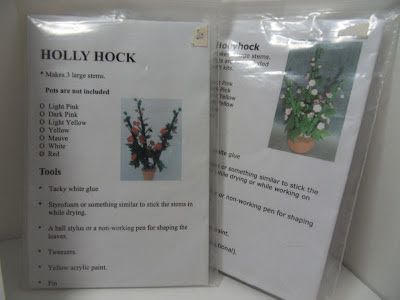
This particular kit today also had it's good points and not so good points.  I absolutely loved the paper they used, I would have to say it's the best paper from any kit I've assembled.  Even though there was a full page of instructions, the only picture was very low resolution and there was no other drawings, so I had to consult a picture of a hollyhock to completely understand the instructions.  Overall I think each stem doesn't have enough flowers, but that's something that I can fix in the future when making more Hollyhocks.  I was pleased with my finished product though, and I completely in all in one day, so that's great.

The real value in kits I find is I learn so much from them, that in the future I can usually make the item without the assistance of a kit.  I definitely feel this way about the Hollyhocks.

Now on to the flower bed....
I started to fill in the garden flower beds, nothing is glued right now, and I haven't added the mulch, so this is just a dry run.

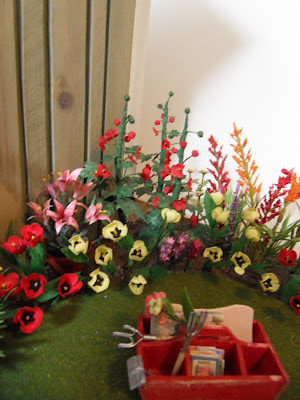
Around the fence, I had already added the forsythia before, but now I have added the tulips (made from scratch by me) and the daisy's (made from a Bonnie Lavish kit).  It was a odd angle to take a picture because the shed itself is there, so this was my best shot.


I think I need to bend the flowers a little and I have to add the mulch, right now it looks a little sparse.  The orange stems are pieces cut from a full size artificial flower.
On the other side of the shed, in the larger flower bed, I got a little more creative.  I had received a fig tree in a garden swap from Ira last year, that was wrapped in burlap the same way you would get any new tree.  I thought I would incorporate this into my display as a "work in progress", the gardener is in the process of planting the new tree.  He doesn't want to get any dirt on the freshly mowed grass, so he has laid down some newspaper to collect the soil taken to make the hole.  It also gave me the great opportunity to cover the seam in the sheet grass I used.  You can see another seam on the other side in the first picture above, I still have to figure out how to disguise that one in the future as well.

The ground was typical Newfoundland soil.  You couldn't just use a shovel, a pickaxe was required to get through the tough Newfoundland dirt.  They call it "The Rock" for a reason!!  Now I don't think Fig trees grow in Newfoundland, but we won't tell the gardener this, he'll find out from himself when the tree, doesn't thrive!!  And one never knows, he may have such a green thumb that he is able to get it to grow! 

I've placed all the plants, including the new hollyhocks in the flower bed under the window.  I still have to glue everything and add mulch.  But I think this one is full enough.  Again the tulips were made by me from scratch, the pansies are purchased, the hollyhocks are the kit I assembled today, the lilies are from a swap with Kim last year and then I've added some ready made greenery from full size artificial flowers and the same orange stems I used in the other flower bed, plus I had some red ones like the orange stems and I have added those.  I think I will switch those out for the pink hollyhocks when I get those made.


The geraniums in the window box were made last year from the Hanky Panky kit, they are my favourite I've assembled so far, the kit only made half of what is in the window box, but once I made those, I was easily able to duplicate them myself.

So I'm going to sit on this much for a day or two, assemble the second hollyhock kit, and then once I am pleased with it all I'll glue everything in place and add the mulch.

Welcome to the new followers, thanks for taking an interest in my blog.

I welcome feedback from everyone, it's what keeps me going back to create more minis.

Until next time.....
Wanda

My Toronto Trip

I've just returned from two trips back to back, first to visit my mom, and then off to Toronto for a business trip.  Even when it's business I have to find a little "me" time for my minis.  I took a few hours on Friday morning to drive to the Little Dollhouse Company on Mt Pleasant Rd in Toronto and again I found lots of new minis to add to my overgrowing collection.

If you notice in my wish list on the side of my blog, one of my future projects I would like to make is an interior designer's shop.  I found this wonderful drafting board with a work in progress.


I also found some wonderful mini drafting tools to add to this future room.  They are so detailed, I wish my camera could have been able to zoom in closer for more detail.  They are made in Italy by "le mini di Pierluigi"  check out their web site, it's fantastic work.  I've emailed the artisan with hopes of seeing more of their minis while visiting Italy in September.  I like to see things before I purchase them, I know that's not always possible in today's world, but if I can see more, I will be so happy.


For years I have been collecting items for a wine cellar project I have in mine.  I have an old wine crate that I plan to build it in and I have so many bottles of wine, I have lost count.  I also found this great crate for Dom Perignon.   I popped a few of the wine bottles I have already collected in the picture, but they were from another purchase made last year.  I don't have a mini bottle of Dom Perignon, so I will have to add it to my list of wants.....ha!


I also found these great mini books by Chaucer.  Let's face it, we can fit books in any project, but I was thinking I will put them in my castle room project.


I purchased this potato bin kit from The Daisy House for my dollhouse kitchen.  I've purchased several Daily House kits and I always like them.


I tried to keep my other current projects in mine and not start planning new ones, (I am so bad sometimes), so I did purchase some items for my garden shed.  I got this lawnmower for the garden shed.  It's just an inexpensive piece, but I think I can "antique" it like I did with the bike, and give it a little more of that well used character.  The white tires definitely have to go!!


I also got this vine, it looks like Coleus to me, and even though I've never seen Coleus grow on a vine, I thought I could cut it up and make it into a plant for the garden shed project.  It's beautifully made from clay and wire.  Such wonderful detail.


 There's a few Cala Lillies on the vine as well, I will keep them for a floral arrangement in another project. 


I also purchased two Hollyhock kits, one in pink and one in red.  Still require lots of flowers for the Garden Shed.  I've been away so much in the past ten days that I've fallen behind again.


My last purchase may be used in either my Garden Shed project or the Bakery, not sure just yet.  But I've always wanted a Al Chandronnait Basket, so now I have one.  Don't you love it.


I purchased one last item, another crate with a Guiness label, and my husband claimed it immediately, since he is the Guiness lover (I had purchased it from him anyway, so no harm done!)  It's amazing, he's even starting to collect a few minis himself as I drag him to all the mini stores on our travels.  It's a contagious hobby isn't it!

Until the next time......

Wanda


Tulips for Dad

I am still working away on my flowers for the Garden shed, but I've been mainly concentrating on red and yellow tulips, they were my dad's favourite flower.  My dad was my mentor for my model building.  A good carpenter himself, he built several model ships that he proudly displayed in our family home and cabin.  He helped me assemble my first dollhouse and assembled the roof and glued on every shingle on my Queen Anne Victorian.

On the eve of Father's Day, I miss him so much, only having lost him in the past three months.  I can't look at a miniature project without thinking of him.  My entire Garden Shed project has become my tribute to him. He loved to work in his shed.

I've made over 60 yellow and red tulips to place around the garden shed with the many other flowers.  It's been a tedious job, but an absolute labour of love.


To every mini maker out there, if you still have your dad in your life, give him a big hug this weekend, I would love to be able to do that to my dad.


Until next time...........
Wanda


More Pictures of the Garden Fence

I've gotten my new camera charger, and was able to get more pictures of the garden fence with more detail.  Have a look.  Hope you like.


This is the one completed side.  You can see a bit of the forsythia I made from scratch from the other side of the fence.

This shows my tulips close up.  The first tulips I made I forgot to make the centers black, so you see those here.  I've since corrected that error in my later tulips.  The daisies were from a swap with Ira and the lilies were from a swap with Kim .  The Hyacinths are also made by me.  They were my first try at a flower from scratch, no kit.


The lilies and daffodils were from a swap with Kim.  I just love the daffodils, it's a flower that I would love to attempt to make myself, but it looks a little more complicated.  Kim doesn't have a blog that I am aware of, otherwise I would provide the link. 

The pansies were from a swap with Monica, aren't they wonderful!  The rest are ready made flowers, and bits of full size artificial flowers that I have taken small sprigs.  I still have to add some "mulch" at the end of the flower bed, I can see it's missing in the picture.  Photos help to see so much that you don't see with the naked eye.


I love the morning glory wrapped around the corner of the fence, it was a purchased item made from clay.  You can see my tulips and hyacinths peeping out on both sides.

As of today I have over 200 followers, which absolutely amazes this absentee blogger.  I cannot expressed my gratitude in your interest in my ramblings about my mini adventures.  I'm going to go through my mini collection and see what I can offer up as a thank you draw for your interest.  Stay tune, I'll be back in a day or so with a draw.  Once again, thank you to all the people who take the time to follow my blog.  I know I learn so much from fellow bloggers, and I hope that I helping someone else in return.

Also thank you to the followers who have been leaving the kind comments on my past postings.  This encouragement is helping me to go back to my workroom each day.

Until next time...........

Wanda


Blooming flowers around the fallen fence

I've been doing very well in the workshop this week.  I've almost completed one section of the gardening on the shed.  I thought you would like to have a peak at my progress.


Sorry that the picture isn't clearer, I just realized this morning that I must have left my camera recharger in the hotel room on my last business trip, and unfortunately that was out of the country, so it's gone.  I had to go out searching for a new camera charger, but in the meanwhile I took this one picture with my I-Pad.  I'll take more with my camera once it's recharged!

I've used some of my handmade flowers, plus some I received from a swap last year, some purchased flowers and some foliage from full size flowers, where I just took a sprig from.  I like the overall look for the flower bed.  You can barely see the fence anymore. I'll try not to cover the fence in too much on the next side.  You can just see a peak of the forsythia I made from the inside of the fence.  Still have to add more flowers to that side before I show you that side.  But it looks like I will have to start making a lot more flowers, this one bed took up almost all my stash of flowers, and I need a lot more for this section, plus I have an even larger flower bed under the window box.  Looks like I will be busy at flower making, but I do love making the flowers.

You can see I have also completed the trim around the entire scene as well.  I was hoping to find some old barn board for this task, but I was not fortunate to find a piece worth using, so I took a regular molding and treated it with "Weather It" and it seems to have done the trick.

I hope you like my progress so far.  If you have any questions about the flowers, don't hesitate to ask. 

Thank for you all your kind comments about the chair I showed you in my last posting.  A couple people commented on the fabric.  I love it.  I found it at a local quilt shop, and I purchased a yard in two colours.  It has a real Victorian feel about it, but it's just brighten up with a little gold detailing in it, which makes it sparkle.  I don't know where I will use the second colour I purchased, it's green, but it's added to my large fabric stash now.

Until next time.....
Wanda

The Garden Fence

I've been dilinquent from blogging the past two weeks, but I haven't been dilinquent from my minis.  I've been busy with a new part of the landscaping.  If anyone had saw the March issue of Miniature Collector, you probably loved the charming cottage with the fallen down fence on the cover, as much as I did.  I couldn't stop thinking about the fence, and I was determined to do something similar in my Garden Shed landscaping.  This is what has been taking up all my time in the past two weeks.  It take a lot of time and definitely patience to make wood look old and weathered.  It also helps to have a very old bottle of "Weather It" to aid in the project.

The results of my labours are shown below.  This is one back corner of the garden shed landscaping.  I still have to add the greenery and flowers, but I thought you would like to see a glimpse of the fence before the flowers and greenery hide it a little.


My bottle of "Weather It" was purchased over 20 years ago in a Miniature Shop in Greensboro, NC, and it's now almost all used up.  I used it to age the trim around the edge of the project as well.  If anyone knows where I can buy more of this stuff I would appreciate if you can drop me an email.  I know some people make their weathering mixture from scratch, so if you have a recipe to share, that would be great as well.

I am anxiously awaiting for my copper sheeting to arrive to finish the roof.  Thanks to some followers who gave me the link for DickBlick.com, I was able to order the necessary copper.

Thanks for all the comments on the flowers in the window box.  I have also been painting and shaping more ivy leaves and geranium leaves to add to the planter.  I've also worked on making a Forsythia bush to go between the fence.  I'll show more of these efforts at a later date!

I also have to welcome a few more followers.  Thanks for taking the time to read my blog.  I hope you gain something from the postings.  Everyone please take the time to check out these follower's blogs as well.
Welcome to:-
Lori, http://ohminiofmine-loshcosh.blogspot.com/
Maru, http://miniaturasdetica1.blogspot.com/
Rosy, http://rosyminiaturas.blogspot.com/
Charipili, http://cositasdedos.blogspot.com/
Rocio, I can't find a blog for Rocio, if I have overlooked it just drop me a comment and I will add it to the next posting.

Again thanks for following.

Until the next time.......

Wanda

And then there were two............

I've tackled the window box project.  My first task was to cut the window box in half, and thanks to my Dremel with a cutting wheel attachment that task was completed in a matter of minutes.


I did learn one lesson from this task though.  When cutting through metal wear a face mask over your mouth and nose.  The metal shavings mustache I was sporting afterwards wasn't pretty!!  I was sneezing metal shavings for a day afterwards.....it wasn't pretty!!

Then it was on to the task of making a shiny black metal window box not so shiny and new.  Again I returned to my Dremel with a fine tip grinding attachment and removed the shine and some of the black paint.  This also helped to prep the surface for the bit of rust that I added to the window box afterwards.  When you consider watering the planter box daily must result in some rust on the metal over time right?!


I liked the end result.  You can see the comparison of the ungrinded half versus the one I have aged.  It made a nice difference.  Now I have an extra window box for a future project!


Then I had to fill it.  I added some foam covered in "moss" and added the geraniums I had made.  I was so pleased with the results of the geraniums.  It's a Hanky Panky kit and I have to say it was my most successful completion of a Hanky Panky kit so far.  It went together beautifully and even though I only had enough petals for 6 flowers, but I had lots of leaves.  I checked my supply of punches and found that I had one very similar to the petals in the kit, and I had the identical paper, since I've bought lots of paper from Hanky Panky, and I punched out petals for 6 more flowers.  I still have lots of leaves left, the kit recommended making some stems with just leaves on, which I may do. Do you think the flower box needs more leaves?  Love to have your opinion.  I have lots of leaves!

I love the geraniums leaves.  As per the kit instructions I had to add some gold chaulk in the middle of the leaves and some rust chaulk around the edges, and I think it adds a lot of realism to the leaves!


Using another Hanky Panky punch, I also added some ivy vine hanging down the planter box.  I could also add more of these, I think I punched out about 10,000 leaves!!  It takes a lot of time to vein and curve them, and I added a little colour around the edges to make them a little varigated.

No flower box in the spring would be complete without another visitor as well.  I purchased my last addition to the window box at last year's Camp Mini Ha Ha.  It was made by one of my fellower campers, and I think she has done a beautiful job on the butterfly.  From the moment I saw the butterfly I knew I had a home for the little guy.  He is perfect in his new spot.


Overall I am pleased with the results.  Hope you like it.


On a last note I have to welcome one new follower!  Amica, I don't see that you have your own blog, but if I have overlooked it, let me know and I will post a link to the blog here.  Welcome, I hope you enjoy the postings!

Until the next time...........

Wanda

Buying Online

I live on a small island in the Atlantic Ocean and there is no retailer for miniatures anywhere near me.  I'm fortunate enough to travel a lot and can always find a miniature store while travelling.  But I do rely a lot on purchasing online. 

One of my favourite places for buying online is miniatures.com.  They don't sell artisan pieces, but I can get my regular supplies from them, plus many times I can get factory made items that I can alter to make more custom.

I recently made a purchase and I just received my order yesterday.  The problem with buying online is that even though they may provide the measurements, you can't always tell scale.  I was so excited about finding a "wrought iron" window box for the garden shed window, but now that I have received it, even though the length is right for the window, the depth is completely out of scale.


It looks even larger in this picture because of the perspective with the walkway, but it's only about 3" long.  I am going to see if I can have it cut in half lengthwise and make into two window boxes.  Once it's filled with flowers, you won't be able to tell that it's missing the back!  Hopefully!  I also need to distress it and give it a little touch of aging so it's not so new and shiny looking.  So I'll have to do a follow up on this piece once I alter it. 

I also got three great Morning Glory vines.  I am hoping to add a part of a fence at the back of the shed, and I thought it would be great to wine a vine through the fence.


The leaves and flowers on the vine are made from clay.  I've been studying it closely and I think I may be able to make flowers from the clay as well.  So far all the flowers I have made have been made with paper, and now I am excited about trying a new medium for flowers.

The funny item in the order was more ground cover.  I had struggled so hard with the sand around the tiles, which by the way is improving with each layer of glue and sand!  I had forgotten that I had ordered several bags of "mulch" for the flower beds.  Wish me more luck with adhering this to the landscaping!


The item that was most exciting in the shipment was my little garden bench.  It was already decorated with flowers, and some of them need to be switched out because they also are a little too large and out of scale, but I think it has a lot of potential.


I also purchased a sheet of metal (brass) geranium leaves.  They have to be spray painted and bent to shape, so I am hoping they turn out nicely.  They are so thin and perfectly scaled.  I am hoping to make geraniums for the window box.


I got also this pair of "wrought iron" plant hangers.  Again I will need to age these a little, but I think they are perfectly scaled.


Overall I am pleased with my new purchases, but it was definitely a reminder of paying close attention to scale when buying online!  I purchased some small tools and some items for my castle project as well, so more to share at a later date!

Most importantly I would like to welcome a new follower.  Please welcome Minisonia.  I couldn't see a blog, but if you have one just drop me an email or comment and I can post a link to your blog.

Until next time..........

Wanda

Paving tiles 101

I've had so many comments on the tiles, I thought you would like to know how I made them.  The tiles themselves are made from DAS air dry clay.  This package was a terra cotta colored clay.  I purchased the package at a Michaels Arts and Crafts store.


I made a jig from a vinyl tile that I glued 1/8" high wood strips around the edge.  This was a technique I got from all the people who posted instructions on using Paper Clay.  I think it's a technique that Rik Pierce uses to make the walls for his miniature houses.


I tried using a pasta maker to flatten out the clay, but it was too inconsistent.  Using the jig I made and running a roller over the clay, the wood strips kept the clay at a consistent 1/8" thickness.  The I used a clear plastic quilters ruler to cut out 1" square tiles. 


I cut some of the tiles in a diagonal shape for the edge of my walkway also.


I laid them out on my walkway to see if I had enough.  I turned them over once the top was dried to allow the bottoms to dry.  You can see in the picture how they started to dry a lot lighter.  I still felt they were too bright, so I aged the tiles with a mixture of diluted white paint, and some raw umber diluted.  I just painted a few spots on, and immediately wiped it off to get an inconsistent look.


This was the finished results BEFORE I tried to add the sand and grass.  That's when all my problems started.  I am working on the PVA glue that was recommended now, hopefully I will have more positive finished results afterwards. 

For now, I am still at this stage...


So wish me luck with today's endeavors.  In the meanwhile, I've been busy making lots of flowers for the garden.  It's very tedious work but the finished results are looking great.  These pictures are for another posting.

Hope the clay tile tutorial helps those trying to make their own paving tiles!

Until the next time..........

Wanda